This page provides examples of the functionality of the WYSIWYG (What You See Is What You Get) rich text editor.
WYSIWYG Rich Text Editor Toolbar
To see where the WYSIWYG paragraph can be used, see the Basic Page Example page. General information about the editor as well as all toolbar functions are displayed and explained below.
To prevent extraneous HTML and CSS code from being added to the page when copying content from an external source (ex: Word, PDF, etc.), as well as maintaining consistent CCSF content styling, editors should clean the content before pasting into the editor.
There are 3 basic ways to clean your content.
Paste content into a simple text editor (ex: Notepad), re-copy the content, then paste into the editor.
Run the content through an online HTML cleaning tool, then paste into the editor.
The text editor has built-in detection, which attempts automatically clean it before pasting.
Options 1 and 2 are recommended, as option 3 does not always do a good job of removing all styles, etc.
You can display a YouTube video by copying and pasting an HTML code snippet into the Source view of the rich text editor.
Load the video in your browser.
Click the Share link.
Click the Embed button.
Select the desired options and click the COPY link.
Edit your CCSF page in Drupal and open the Source view in a WYSIWYG content area.
Paste the copied YouTube code.
Click the Source button again to view the embedded video.
Save your page.
Example
TIP: Customize the video display by editing attributes of the embedded code's <iframe> tag. The above video uses the following attributes (some removed for brevity):
Select the text you would like to hyperlink and click the Link button (). In the dialog box enter the link URL.
Internal Links
When linking to pages on the CCSF website, search for the name of the page by typing in the URL field. A dropdown list will be displayed with matching pages. Click on the desired page from the list. The URL field is then populated with the Drupal node path (ex: /node/1).
Using Drupal node references ensures that links will not break when the target page URL has been changed.
When linking to documents on the CCSF website, enter the relative URL to the file as given by the Web Content team. The URL will be of the form /sites/default/files/<year>/document/<file_name>.
External Links
When linking to pages or documents on external sites, enter the absolute URL (ex: https://sf.gov/).
Advanced Options
In the ADVANCED section of the Add Link dialog there are two fields of interest: CSS classes and Open in new window/tab.
CSS classes
This allows you to add the name of a CSS class to the class attribute of the HTML anchor tag to style the link. CCSF has two predefined classes for styling links.
button - Formats link as a button
learn-more - Adds an arrow icon to the right of the text
Open in new window/tab
Check this box to open links in a new window/browser tab. Use this for document and external website links.
Remove Link
Select hyperlinked text and click the Unlink button () to remove the link from the text.
Click the Horizontal Line button () to insert a formatted horizontal divider line.
TIP: When adding a horizontal line as the last content in the text editor, it will add an extra line break underneath it. If you want to remove it, click on the Source icon and remove the <p> </p> code immediately below the <hr /> tag.
Video Embed
Click the Video Embed button () to insert an embedded video using a URL (YouTube, Vimeo, etc.).
TIP: It's a good idea to uncheck the Autoplay option and check the Responsive Video option.
Document Embed
DO NOT USE the first E button (). This option will be removed in the near future. To link to documents, insert an internal document link (see the Links accordion, above).
Media Embed
Use the Media Embed (second E) button () to insert an inline image.
Existing Image
Embedded Image Example - John Adams map location
To use an existing image (an image that has already been uploaded to the server), in the Select Media tab...
Check the box above the image
Scroll down and click the Select entities button
Click the Next button
New Image
To upload your own image, use the Upload Image tab...
Click the Choose File button to select a file from your computer
Click the Select files button
Click the Next button
Image Properties
Set properties in the Embed Media Item dialog:
Link to (optional)
Entering a URL in this field will create a link on the object pointing to the given URL.
Open in a new window? (optional)
Check this box to open the link in a new browser tab/window.
Image style (optional)
If your image has been resized to the actual size you would like it to be displayed, leave the default None (original image) selection in place. Otherwise, use a predefined setting to style the image. You may need to perform some trial and error with the different options to find the best fit.
Link image to
Leave this set to Nothing.
Alternate text (required)
Always enter descriptive text in this field. This is required for ADA-compliance.
Align (optional)
Select the desired alignment for the image with respect to the surrounding text.
Caption (optional)
Enter text in this field to display a caption below the image.
Click the Content Templates button () to view the available templates.
Alert Template
Alert template TIP: Alert templates may not add a trailing break, making it difficult to add content immediately after the alert. To add a break, click the Source button and add a <p></p> tag after the alert div (<div class="alert-card"></div>).
Anchor link
An Anchor link allows linking to an element within the page that has a specific HTML element id attribute. When a link is clicked that points to the ID of the Anchor link, the page will scroll to that location.
An Anchor link has a CSS class called anchor that hides the link in the published version of the page and an ID (set by default to anchor-link) that uniquely identifies the HTML element within the page. To allow scrolling the page to where the Anchor link code is placed, you create a normal link that specifies the ID in the link URL.
Bootstrap is a front-end styling toolkit that displays web-accessible tables in a responsive manner, making them viewable across different viewport sizes. For accessibility reasons, tables should only be used for tabular data and not for content layout. Using Bootstrap tables is the preferred method of adding tabular content on the CCSF website.
#
First
Last
Handle
1
Mark
Otto
@mdo
2
Jacob
Thornton
@fat
3
Larry
the Bird
@twitter
TIPS:
Right-click anywhere inside the table to display a pop-up to edit table options and properties.
To copy/paste tables from external sources (Excel, Word, Google Spreadsheets, etc.), first use an online tool like TableCleaner, then paste the table into the text editor. Afterwards, you will also need to add the table and table-striped CSS classes to the opening <table class="table table-striped"> tag in the Source view.
Border/Grey Card
Border Card template content.
Grey Card template content.
Padded Content
This template adds padding to the left and right of the example content, which consists of <H2> header text and italicized body text.
For every dream, there is a way
Rooted in the values of inclusiveness, integrity, innovation and creativity, we offer a high-quality education that’s uniquely San Francisco. We believe in opening doors and providing opportunities for each and every Bay Area resident.
Section Title
This template centers example content with an <H1> heading and normal body text.
Finibus Bonorum et Malorum
Lorem ipsum dolor sit amet, consectetur adipiscing elit, sed do eiusmod tempor incididunt ut labore et dolore magna aliqua.
Styled Intro Text
This template adds example content within an HTML tag (<em class="text-muted h4"></em>).
Lorem ipsum dolor sit amet, consectetur adipisicing elit, sed do eiusmod tempor incididunt ut labore et dolore magna aliqua. Ut enim ad minim veniam, quis nostrud.
Two/Three Column Templates
These templates use the Bootstrap Grid System to generate layouts with 2 or 3 columns.
Lorem ipsum dolor sit amet, consectetur adipiscing elit.
Quisque ultrices massa nec diam fringilla, quis posuere tellus commodo.
Maecenas eget metus consectetur, luctus odio eu, laoreet justo.
Lorem ipsum dolor sit amet, consectetur adipiscing elit.
Quisque ultrices massa nec diam fringilla, quis posuere tellus commodo.
Maecenas eget metus consectetur, luctus odio eu, laoreet justo.
Lorem ipsum dolor sit amet, consectetur adipiscing elit.
Quisque ultrices massa nec diam fringilla, quis posuere tellus commodo.
Maecenas eget metus consectetur, luctus odio eu, laoreet justo.
This is content formatted with the Intro Text style. It is the same font size as H4 headings.
Inline Styles
Learn More Link
DO NOT USE this style - it will be removed in the near future. Instead, use the learn-more CSS class attribute (ex: <a href="https://www.ccsf.edu" class="learn-more">CCSF Website</a>).
Lorem Ipsum is simply dummy text of the printing and typesetting industry. Lorem Ipsum has been the industry's standard dummy text ever since the 1500s, when an unknown printer took a galley of type and scrambled it to make a type specimen book. It has survived not only five centuries, but also the leap into electronic typesetting, remaining essentially unchanged. It was popularised in the 1960s with the release of Letraset sheets containing Lorem Ipsum passages, and more recently with desktop publishing software like Aldus PageMaker including versions of Lorem Ipsum.
Center
Lorem Ipsum is simply dummy text of the printing and typesetting industry. Lorem Ipsum has been the industry's standard dummy text ever since the 1500s, when an unknown printer took a galley of type and scrambled it to make a type specimen book. It has survived not only five centuries, but also the leap into electronic typesetting, remaining essentially unchanged. It was popularised in the 1960s with the release of Letraset sheets containing Lorem Ipsum passages, and more recently with desktop publishing software like Aldus PageMaker including versions of Lorem Ipsum.
Right
Lorem Ipsum is simply dummy text of the printing and typesetting industry. Lorem Ipsum has been the industry's standard dummy text ever since the 1500s, when an unknown printer took a galley of type and scrambled it to make a type specimen book. It has survived not only five centuries, but also the leap into electronic typesetting, remaining essentially unchanged. It was popularised in the 1960s with the release of Letraset sheets containing Lorem Ipsum passages, and more recently with desktop publishing software like Aldus PageMaker including versions of Lorem Ipsum.
Justify
Lorem Ipsum is simply dummy text of the printing and typesetting industry. Lorem Ipsum has been the industry's standard dummy text ever since the 1500s, when an unknown printer took a galley of type and scrambled it to make a type specimen book. It has survived not only five centuries, but also the leap into electronic typesetting, remaining essentially unchanged. It was popularised in the 1960s with the release of Letraset sheets containing Lorem Ipsum passages, and more recently with desktop publishing software like Aldus PageMaker including versions of Lorem Ipsum.
If you see extra vertical whitespace (line breaks) in the WYSIWYG view of the text editor and are unable to remove it by using the Backspace or Delete buttons, click on the Source button () in the toolbar and remove the following code:
<p> </p>
Click on the Source button again to verify the space has been removed.
The <Enter> key inserts a <p></p> tag in the HTML source, which roughly translates to double line spacing. To use single line spaces, hold down the <Shift> key, then click <Enter> to break to the next line. This will add an HTML <br/> tag instead of enclosing the text in a <p></p> tag.
If you want to remove the Intro Text style formatting, or when you attempt to add a line break to add normal text in the next paragraph, the formatting still persists.
Content styled with Intro Text.
Hit <Enter> key to add a line break results in another paragraph with the same styling.
There are two options to remove the Intro Text style:
Highlight the text and select Normal from the Format dropdown.
Click the Source button and remove the following from the containing <p> tag:
class="text-muted h4"
Content styled with Intro Text.
Hit <Enter> key to add a line break results in another paragraph with the same styling. Reformatted as normal text.


 Bold
Bold Italic
 Superscript
 Subscript
 Clear formatting from a text selection
 ). In the dialog box enter the link URL.
 ) to remove the link from the text.
 ) to format a section of text as a quote.
 ) to insert a table.
 ).
). ) to insert a formatted horizontal divider line.
 ) to insert an embedded video using a URL (YouTube, Vimeo, etc.).
 ). This option will be removed in the near future. To link to documents, insert an internal document link (see the Links accordion, above).
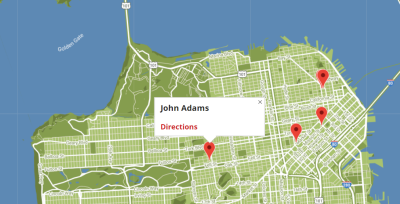


 ) to view outlines of the different HTML elements within the editor content.
 ) to view and edit the HTML source code for the editor content. Click the button again to return to the WYSIWYG view.
 ) to enlarge the editor frame to fill the entire browser window. Click the button again to return to the normal view.

 Left
Left Center
 Right
Right Justify
 Unordered List
 Ordered List