(For log in help, view Log in, Navigate, Log off.)
Certificate or Major PSLO Assessment Reports are submitted once every 6 years in concert with the updating of the program description. These reports pull data from CRN-level (section-level) assessment reports over multiple semesters for all the courses that are part of a program.
WARNING: ALL information entered into these reports will be publicly available. Please enter data in a way that will be understandable by anyone who reads it. Thank you!
TABLE OF CONTENTS
- Create Proposal
- Main
- Outcome Terms
- Aggregate Report
- Analysis, Next Steps, and Highlights
- Submit
- Troubleshooting
Create Proposal
To create a new assessment report, click on the Create Proposal button. (*A “proposal” in CurricUNET is any assessment report, program review, course outline, or program description and their associated reports.*)
(If you want to edit a draft you already created, search for it, open it, and edit it. See Find and View Curricula.)
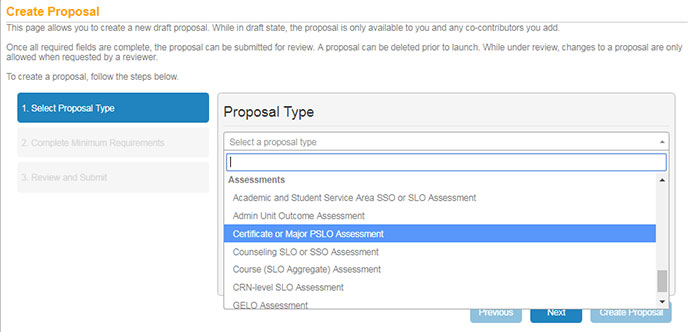
1. Select Proposal Type. From the drop-down Proposal Type menu, scroll to bottom, under Assessments, and choose Certificate or Major PSLO Assessment. Then click Next.
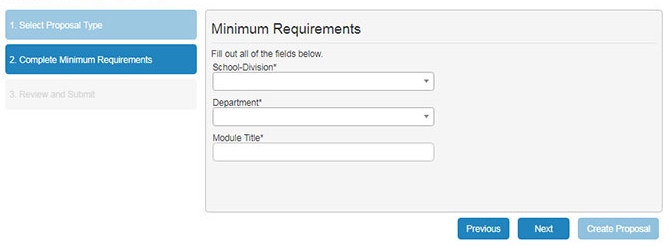
2. Complete Minimum Requirements. From the School-Division menu, choose your school. In the Department field, choose your department from the drop-down menu. In the Module Title field, enter anything you want (this field gets overwritten by CurricUNET once you create the proposal, so don’t waste time thinking of a title, just enter something; you can’t leave it blank). Click Next.
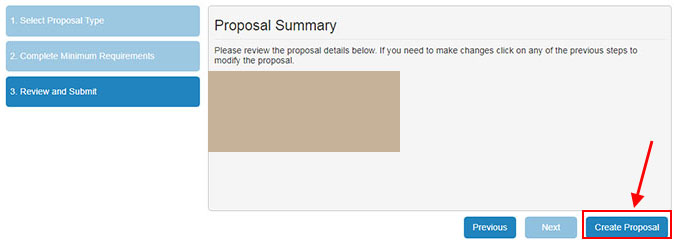
3. Review and Submit. Simply click Create Proposal (no need to look over the summary because 100% of the information shown can be modified as soon as the proposal is created).
Main
Once your proposal has been created, you will see multiple tabs on the left. You must proceed through all these tabs and complete all the information on each before you can Launch (submit) your proposal. The first tab that appears is the Main tab.
- Use the School/Division and Department drop-down menus to change these values if you need to.
- From the Program drop-down menu, choose your program.
- From the Version menu, choose the correct program version.
- Click Save.
Outcome Terms
Click the Outcome Terms tab to continue. Click the Add New Item button.
- From the Semester drop-down menu, choose the semester of a term whose CRN data you want to include in this report.
- In the Year field, enter the 4-digit year for the semester you're including.
- Click Save.
After you click Save, you will be back at the first screen, where you can again click the Add New Item button and add another term. You can also click on the blue bar above the semester/year you just saved, if you'd like to change your choice.
Aggregate Report
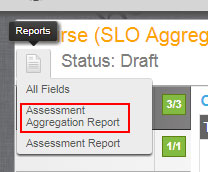
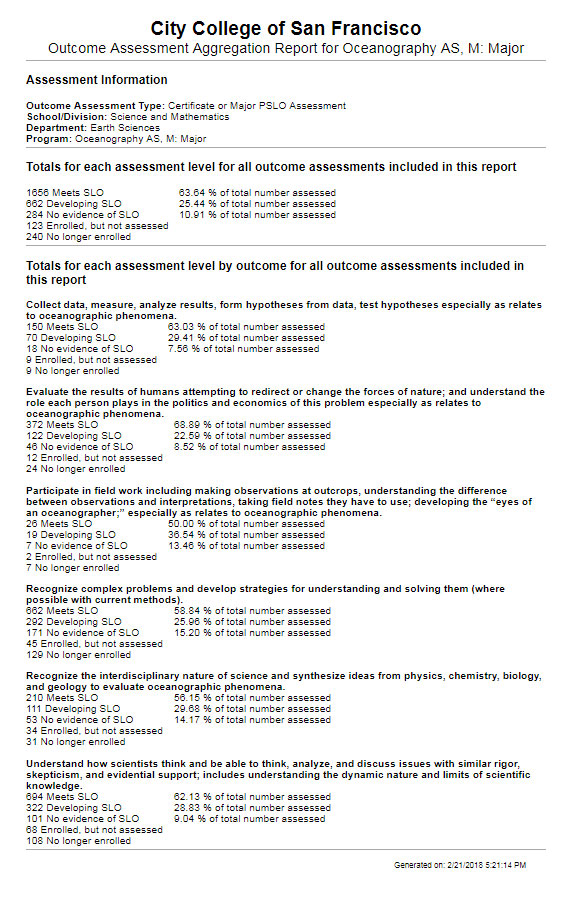
Click on the Report icon at the top left (the icon to the left of the text “Status: Draft”) and choose Assessment Aggregate Report. Study the aggregate data for the terms you chose above. You will refer to this information in the questions that come in the next tabs in this report. Also, search for and study CRN-level and course-level assessment reports for your program during the same terms to see full details from the various instructors and courses. (*NOTE: To close the Report Icon menu, click on it again.)
Analysis, Next Steps, and Highlights
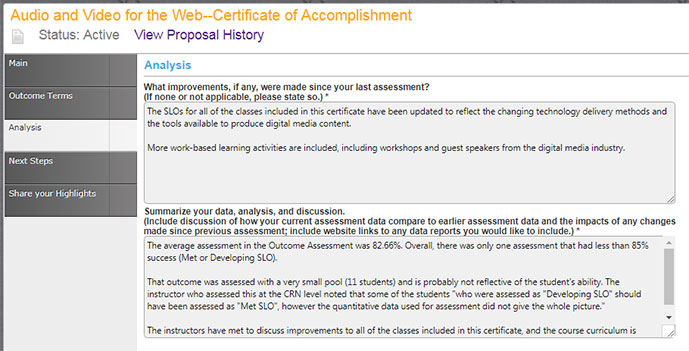
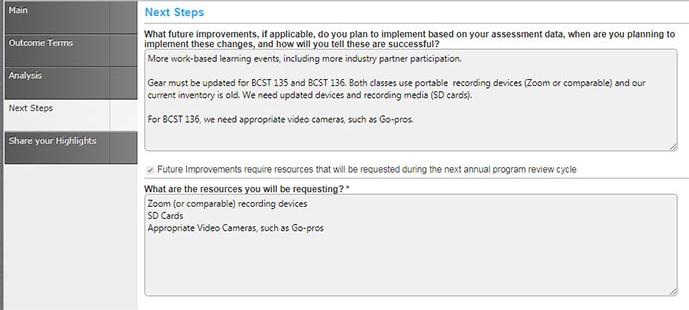
Click on each of the remaining tabs and complete the rest of the questions on the screens. Click Save on each.
Submit
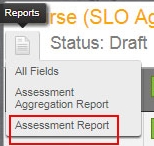
At the top left of the screen, click on the Report icon (the icon to the left of the text “Status: Draft”) and choose Assessment Report to open and see what your report will look like to the public when you submit it.
When ready to submit, click Launch (in the upper right of the screen). Your report will go to your department chair for approval before becoming active. For more information see Assessment Approvals.
Troubleshooting
- How is the report title chosen? The first time you click Save, the report will get a new name generated automatically, overwriting the one you entered at the Create Proposal step.
- If you have problems using the drop-down menus, use the arrow keys on your keyboard to move up and down.
- If your department doesn’t appear, it means you need “origination rights” for this department. Email curricunet@ccsf.edu for assistance.
- If the SAVE button isn’t visible in lower right of screen, it means you have nothing to save.
- If the Launch button is greyed out, it means you’re missing data in required fields. Look at the badges that appear to the right of each tab label and if one of those is still orange, return there to find the required fields.
- Having trouble finding your report after you’ve created it? When you click on the Curriculum Button and choose Assessments, the default list you see is all your own assessments. Use the keyword search box to conduct a simple search through this list. Click the advanced search button to the right of the magnifying lens to narrow the results to include only the status you want (such as "Draft"). If you sort on Subject (ascending), the program-level assessment reports (which have no subject associated with them) will appear on the top of the list.


