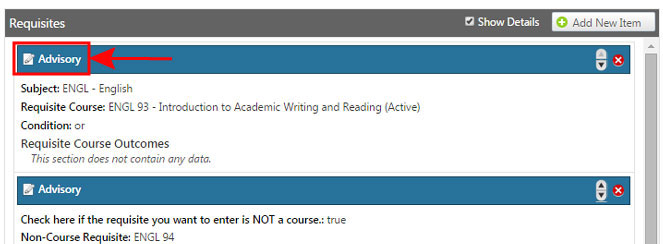
The screen above shows the layout of the Requisites main screen with a list of requisites already defined for this particular course.
Requisites is the term used to include:
- Advisory
- Advisory Pre/Corequisite is one that can be completed prior OR concurrently
- Corequisite
- Prerequisite
- Pre/Corerequisite is one that can be completed prior OR concurrently.
To edit an existing requisite, just click on the blue banner title near where it says the requisite type (shown with the red arrow above).
*NOTE: A current BUG in CurricUNET's display can make it so this screen is hard to view on your browser (the space available for the requisites is too small to work with). If this is happening in your browser, you can work around the bug by:
- Press CTRL-minus (or Command-minus on a MAC) to shrink the size of the window.
- Click on a different tab.
- Return to the Requisites tab (the space available to show requistes should now be much larger).
- Press CTRL-plus (or Command-plus on a MAC) to increase the size of the window again.
Create a new requisite
The Show Details check box allows you to show or hide the details that appear in you list of existing requisites.
1. Click on the Add New Item button to create a new requisite for this course.
Requisite details
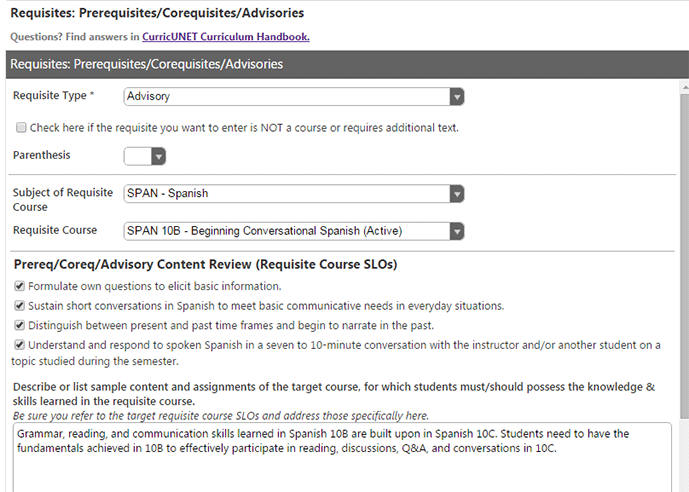
The above screenshot shows all the fields for creating a new requisite. Note that you have a number of tasks to complete here:
- Choose appropriate Requisite type (see below for more information).
- Select the requisite course from drop-down menus (or check the box indicating the requisite is NOT a course -- see below for more information). Choose only Active or Approved course, not In Review.
- For course requisites, after you choose your course, the SLOs for that course will appear. IGNORE these, the checkboxes are inactive.
- Describe in detail how the knowledge and skills from the target course applie to the current course.
- Use parentheses and condition statements to indicate the relationship among multiple requisites (see below for more information).
- Don't forget: Click Save (if new) or Update (if updating an existing item).
Requisite type
From the Requisite Type drop-down menu, choose the appropriate requisite type from the list.
- Prerequisites must be completed prior to registering for this course.
- Corequisites must be completed concurrently with this course.
- Co/Prerequisites can be taken prior OR concurrently with this course.
- Advisories are recommended.
- Advisories Co/Prerequisites are recommended to be taken prior OR concurrently with this course.
Noncourse requirements
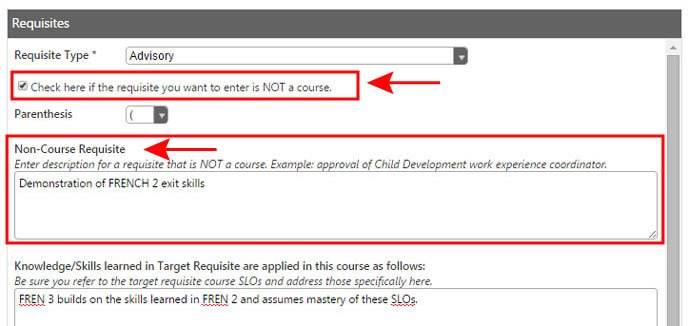
1. If you do not want to enter a course requisite, check the Check here if the requisite you want to enter is NOT a course checkbox.
2. Then describe the non-course requisite and the knowledge/skills learned in that requisite as applied to the course.
3. Click Save (if new) or Update (if updating an existing item).
Relationship of multiple requisites
The default relationship among each individual requisite you create is “AND” UNLESS you have chosen a condition from the submenu.
Examples:
- 3 requisites, no conditions chosen means A + B + C.
- 3 requisites in which the second two are meant to have an or between them: A + (B or C). First requisite has no conditions or parentheses; Second requisite has an open parenthesis at start and OR condition at end; Third requisite has a closed parenthesis at end.
Note that the order of the requisites is highly important here. So be sure you have the order correct on the main screen first. Be sure your conditions work logically with your order. To check, click on the report icon in the upper left of the screen, and choose Course Outline from the drop-down list. Review the requisites listing in the course outline.
Don't forget: Click Save (if new) or Update (if updating an existing item).
Ordering requisites
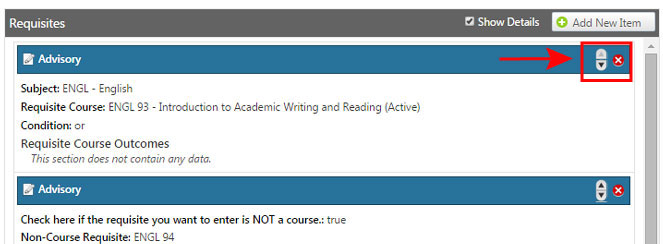
The screenshot above is of the main requisite screen (click on the Requisite tab from the left-hand nav menu or cancel out of the requisite detail view to see this screen).
On the right-hand edge of each requisite listed:
- Click on the up and down arrows of the arrow icon to move a requisite up and down in the list.
- Click on the X icon to delete a requisite.
Note that the relationship of all the requisites is dependent on their order. Be sure your conditions work logically with your order. To check, click on the report icon in the upper left of the screen, and choose Course Outline from the drop-down list. Review the requisites listing in the course outline.
Curriculum Committee Notes
- Complete all the requested information in the Requisites tab in CurricUNET including checking off of the relevant SLOs of the requisite course (that appear once you enter the course #) AND describing or listing the sample content and assignments of the target course, for which students must/should possess the knowledge & skills learned in the requisite course.
- Contact the chairs of the departments in which the requisite classes are listed, get their confirmation that these are acceptable requisites, and provide notes on those conversations within the CONSULTATIONS tab within CurricUNET.
- When contemplating the type of preparation needed for a course or program, departments must decide whether the preparatory knowledge/skills are either required (prerequisite) or recommended (advisory).
- If critical reading/writing or computation skills are needed for success in a credit course or program, and if these skills are not taught in the target course, then the department must consider the appropriate English, ESL, or math course level that will provide the preparation needed (in consultation with the English Eligibility Coordinator, Credit ESL Coordinator, or Math Dept chair).
- If appropriate prerequisites, corequisites, or advisories are identified, be sure to:
- Complete all the requested information.
- Provide notes on the discussions with English, ESL, or Math contacts within the CONSULTATIONS tab within CurricUNET.
More questions?
For more information on requisites, refer to the Requisites Section of the Curriculum Handbook.
Next steps
If you added or modified requisites, which are themselves courses in another department, you are required to communicate with the chairs and appropriate faculty within those departments to get their agreement/approval. You will need to document that conversation in the Consultations tab.
Consultations is also where you can indicate conversations that you've had regarding possible content overlap.


